Your name is one of the most personal things you can write. Whether it's on a greeting card, the first page of a notebook, or a handwritten letter, seeing your name flow across the paper in beautiful cursive can make even a simple moment feel special.
But writing your name in cursive isn't always as easy as writing individual letters.
Maybe your first capital looks awkward, the letters don't connect smoothly, or your last name becomes messy when you write it quickly. Sometimes the entire name looks uneven, even though each letter seems fine on its own.
The good news is that learning how to write your name in cursive becomes much easier when you practice one part at a time.
In this guide, you'll learn how to write your first and last name in cursive, connect difficult letters, choose a handwriting style, and create a neat, attractive result. You'll also find name examples, common mistakes, and practical exercises for children and adults.
How to Write Your Name in Cursive: Quick Answer
To write your name in cursive, begin with the capital letter, practice the lowercase letters, and join them using the entry and exit strokes of your chosen handwriting style.
Follow these seven steps:
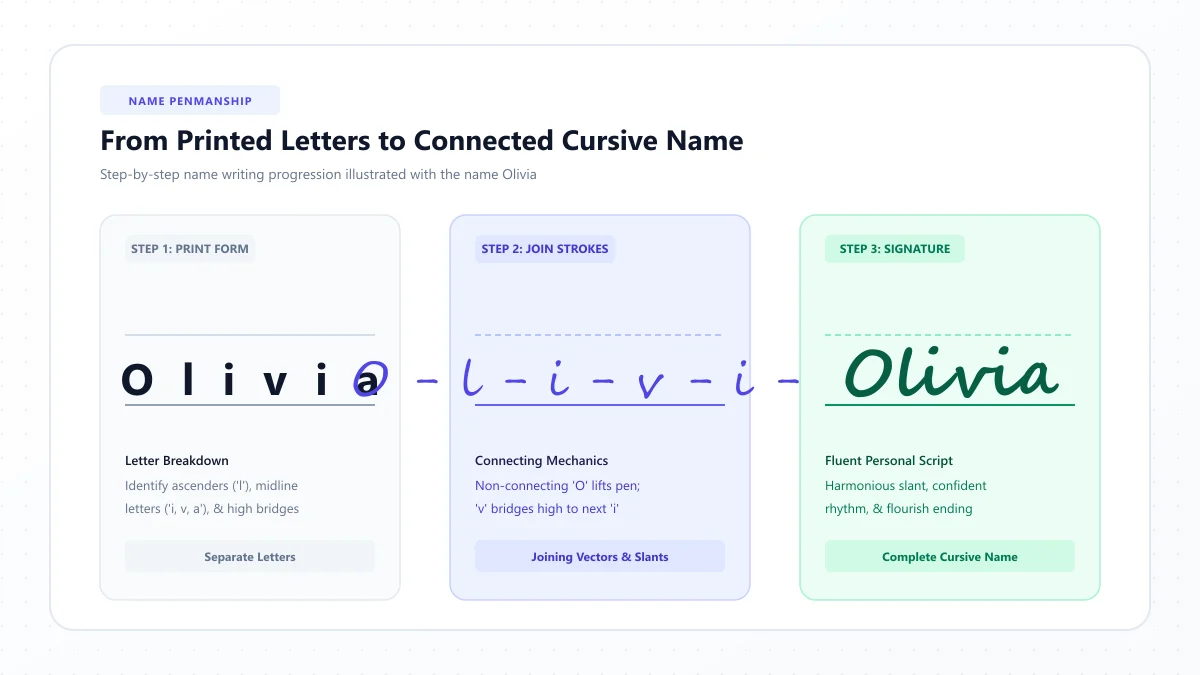
- Write your name in ordinary print so you can see every letter.
- Choose a consistent cursive handwriting style.
- Practice the first capital letter separately.
- Review the lowercase letters and their connecting strokes.
- Practice difficult two-letter combinations.
- Write your entire name slowly on lined paper.
- Adjust the spacing, slant, and letter sizes until your name looks balanced and readable.
For example, if your name is Olivia, begin with the uppercase O. Then practice the lowercase sequence livia, paying particular attention to the tall l, the dotted i letters, and the connection between v and i.
Repeat the name a few times, focusing on smooth movements rather than speed.
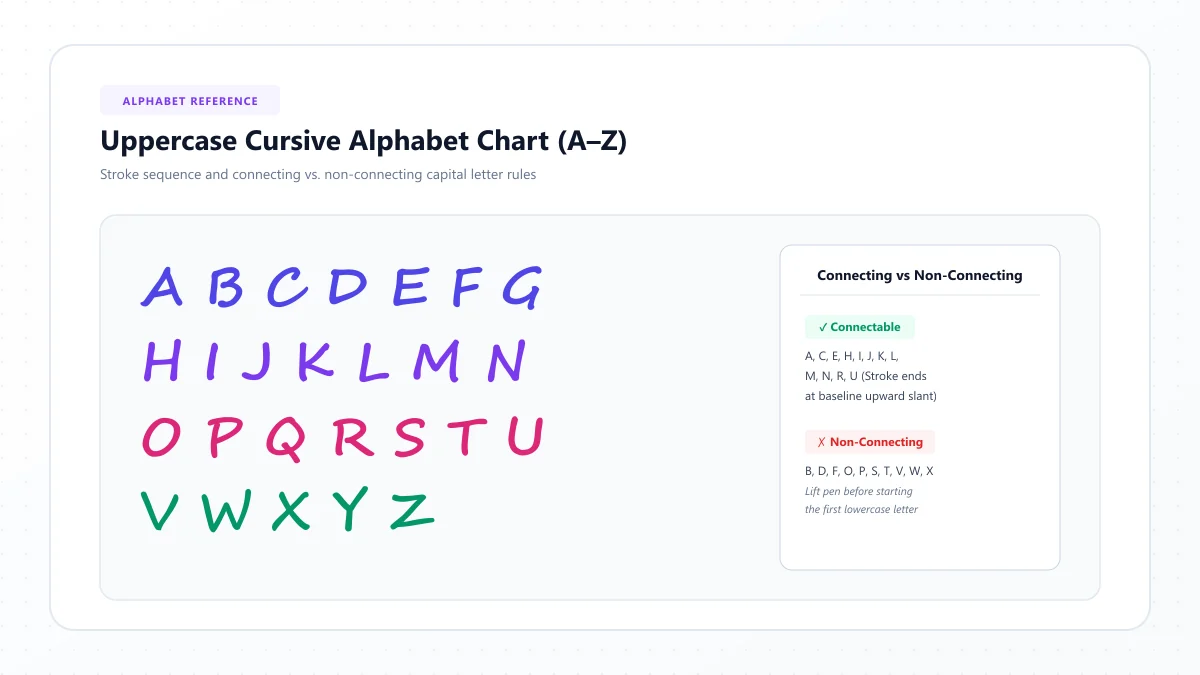
Beginner tip: Not every uppercase cursive letter needs to connect to the next letter. Some handwriting styles use a deliberate pen lift after the capital.
What Does Your Name Look Like in Cursive?
The appearance of your name depends on the handwriting method you choose.
Traditional looped cursive often uses flowing connections, tall ascenders, rounded lowercase letters, and distinctive capitals.
Simplified modern cursive may use fewer loops and more familiar letter shapes.
Decorative calligraphy can include elaborate capital letters and additional flourishes.
Consider the name Isabella.
In ordinary print, it contains six separate letters:
S – o – p – h – i – a
In handwritten cursive, the letters follow a coordinated series of movements. The capital S may be formed separately, while the lowercase letters can connect according to the chosen style.
A digital script example looks like this:
Sophia → 𝓢𝓸𝓹𝓱𝓲𝓪
This shows a decorative visual style, but it doesn't demonstrate the pen movements needed for real handwriting.
If you want to see your own name in different digital lettering styles, try our free Cursive Name Generator.
For physical handwriting, use a reliable cursive alphabet model and practice the actual letter formation.
Step 1: Write Your Name in Print First
Before trying cursive, write your name clearly in ordinary handwriting.
For example:
First name: Charlotte
Last name: Wilson
Now divide each name into its individual letters.
Charlotte:
C – h – a – r – l – o – t – t – e
Wilson:
W – i – l – s – o – n
This helps you identify the letters you'll need and the connections that may require extra practice.
You can also mark which letters contain:
- Ascending strokes, such as h and l.
- Descending strokes, such as g, j, p, and y.
- Rounded shapes, such as a and o.
- High connecting exits, often seen in forms of b, o, v, and w.
- Dots or crossbars, such as i, j, and t.
Identifying these features makes the next steps more manageable.
Step 2: Choose a Cursive Handwriting Style
There isn't just one way to write a name in cursive.
Different handwriting methods use different shapes, connecting movements, and capital letters.
Choose a style that matches your learning goals.
Traditional looped cursive
Traditional looped cursive uses flowing lowercase connections and recognizable ascending and descending loops.
It can be a good option if you're learning a familiar school handwriting method.
Simplified modern cursive
Modern simplified styles often reduce decorative loops and use more straightforward letterforms.
They can suit everyday handwriting, provided you follow a consistent model.
Spencerian-inspired lettering
Spencerian penmanship is known for graceful slants, elegant proportions, and distinctive historical capitals.
It can look beautiful for names and personal lettering, although accurate traditional Spencerian writing requires learning its particular movements.
Decorative calligraphy
Calligraphy offers greater room for ornamental shapes, flourishes, and visual contrast.
It is especially useful for cards and artwork, but it's not identical to ordinary joined handwriting.
Which cursive style should you choose?
Your goal | Suggested approach |
|---|---|
Writing your name for school | Follow your school's cursive method |
Everyday personal handwriting | Readable traditional or simplified cursive |
Elegant handwritten notes | A consistent flowing script |
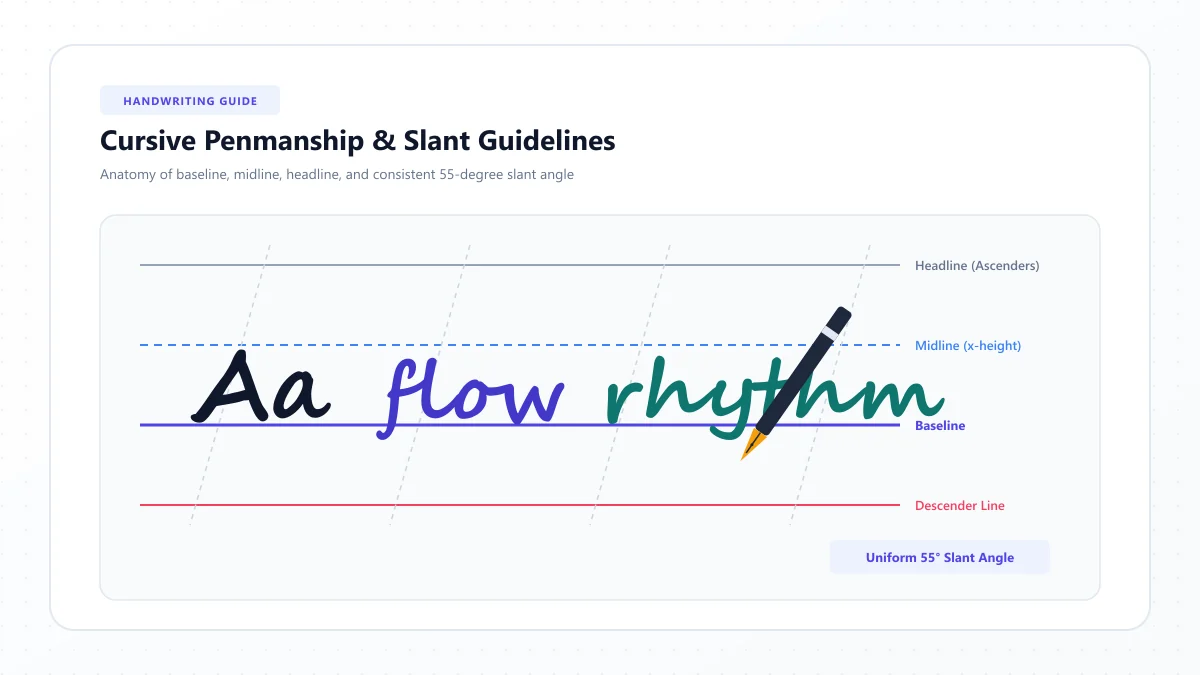
Historical penmanship | Spencerian instruction |
Decorative greeting cards | Calligraphy-inspired lettering |
Digital profile names | An online cursive name generator |
If you're a beginner, stick with one model until you're comfortable with the letterforms. You can add personal variations later.
Step 3: Practice the First Capital Letter
The first letter is often the most noticeable part of a handwritten name.
It may also be more difficult than the lowercase letters because cursive capitals sometimes look very different from printed capitals.
For example:
- A in Alice
- C in Charlotte
- E in Emma
- G in Grace
- M in Michael
- S in Sophia
- W in William
Begin by practicing the capital on its own.
How to practice your capital letter
First, study its shape in your chosen cursive handwriting model.
Notice the starting point, main curves, height, and finishing stroke.
Next, write the letter slowly on lined paper.
Repeat it several times, keeping the proportions reasonably consistent.
Once the capital is recognizable, write it beside the next lowercase letter.
For example:
A → Al → Alice
C → Ch → Charlotte
S → So → Sophia
The exact capital-to-lowercase movement depends on the handwriting style.
If your capital finishes without a natural exit stroke, lift your pen and begin the next letter separately.
Don't force an awkward connection simply to keep the pen on the paper.
For additional capital-letter references, visit our Cursive Alphabet Chart.
Step 4: Learn the Lowercase Letters in Your Name
After practicing the capital, focus on the remaining letters.
Many lowercase cursive letters share a small set of basic movements.
For example:
Oval letters: a, c, d, g, o, q
Tall and looped letters: b, h, k, l, f
Short curved letters: i, u, t, w
Arch-like letters: m, n, r
Descending letters: g, j, p, q, y
The exact forms differ between handwriting styles, and some letters belong to more than one movement group.
You don't need to relearn the entire alphabet to practice your name.
If your name is Mia, concentrate on M, i, and a.
If your name is Alexander, work on A, l, e, x, a, n, d, e, and r.
This personalized approach lets you spend more time on the letters you'll actually use.
Try a letter-building exercise
Suppose your name is Emma.
Start by writing lowercase e several times.
Next, practice lowercase m, focusing on balanced rounded arches.
Then write:
e – m – m – a
Once each letter feels comfortable, begin joining them into the complete name.
For detailed individual letter references, visit our Cursive Letters Directory.
Step 5: Connect the Letters in Your Name
One of the most important skills in cursive handwriting is learning how one letter transitions into the next.
A connecting movement usually involves the exit stroke of the first letter leading into the entry stroke of the second.
But not all connections follow the same path.
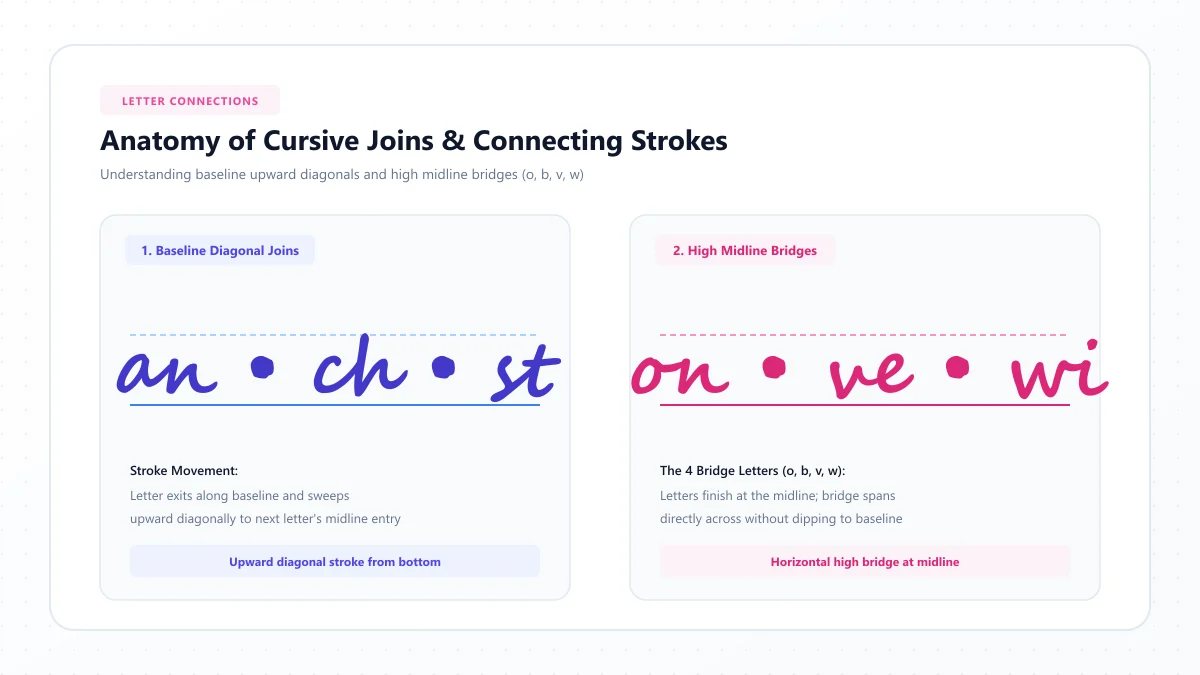
Low connections
Some lowercase letters finish near the baseline and lead upward toward the next letter.
Examples include the connections in words and names containing pairs such as:
an, in, am, un
These can be useful starting exercises.
High connections
Some cursive letterforms, including many versions of o, v, w, and b, finish higher on the writing line.
For example, the connection from o to n in a name like Donna may differ from the connection after a.
Practice the relevant letter pair separately rather than forcing every join to begin near the baseline.
Rounded letter connections
Letters such as a, d, g, and o include rounded forms.
Their connecting strokes should preserve the shape of the oval or curve.
If the next letter begins too close, the oval may become distorted.
Connections after descending letters
Letters such as g, j, and y extend below the baseline in many cursive styles.
The connection to the following letter depends on where the descending movement returns.
Some forms allow a natural continuation, while others require a pen lift or additional stroke.
Follow your chosen handwriting model.
Practice the difficult parts of your name
If your name is Olivia, try:
li → iv → vi → ia
If your name is Charlotte, practice:
Ch → ha → ar → rl → lo → ot → tt → te
If your name is William, try:
Wi → il → ll → li → ia → am
Practice each pair a few times.
Then return to writing your full name.
Remember that the precise joins vary between cursive systems. The aim is correct, readable connections, not forcing every pair into the same pattern.
Step 6: Write Your Full Name in Cursive
Once your first name feels comfortable, try writing your first and last name together.
For example:
Emma Wilson
or:
Alexander James
Writing a full name introduces new details, especially spacing and the relationship between two capital letters.
Keep your capitals consistent
Try to make the opening capital of your first name and the capital of your surname follow the same overall style.
They don't need identical shapes, but their proportions should feel related.
Leave a clear space between names
Your first and last name should be separate words.
Finish the first name, lift your pen, and begin the next name after a comfortable word space.
Avoid joining the last letter of your first name directly to the first letter of your surname.
Use the same baseline
The main bodies of both names should rest on a consistent baseline.
If your last name starts noticeably higher or lower, the complete name may look unbalanced.
Maintain a comfortable slant
Many cursive styles use a forward slant, but the angle varies.
Choose a consistent slant rather than forcing an exaggerated tilt.
Practice the complete name
Write your full name several times.
Compare the versions and choose one detail to improve.
For example, you might focus on making the first capital smaller or increasing the space between the two names.
15 Beautiful Cursive Name Examples
The following examples show names in decorative Unicode script.
They're useful for exploring visual styles, but they are not stroke-order models for handwriting.
Name | Digital cursive example | Handwriting practice focus |
|---|---|---|
Olivia | 𝓞𝓵𝓲𝓿𝓲𝓪 | Tall l, dotted i, high v exit |
Emma | 𝓔𝓶𝓶𝓪 | Repeated m arches |
Sophia | 𝓢𝓸𝓹𝓱𝓲𝓪 | Oval o, p descender, tall h |
Charlotte | 𝓒𝓱𝓪𝓻𝓵𝓸𝓽𝓽𝓮 | Long name and double t |
Amelia | 𝓐𝓶𝓮𝓵𝓲𝓪 | Arch movements and tall l |
Isabella | 𝓘𝓼𝓪𝓫𝓮𝓵𝓵𝓪 | Double l and letter spacing |
Lily | 𝓛𝓲𝓵𝔂 | Ascenders and descending y |
Grace | 𝓖𝓻𝓪𝓬𝓮 | Capital G and rounded a |
Mia | 𝓜𝓲𝓪 | Short connected name |
Chloe | 𝓒𝓱𝓵𝓸𝓮 | Tall letters and high o connection |
William | 𝓦𝓲𝓵𝓵𝓲𝓪𝓶 | Double l and dotted i |
James | 𝓙𝓪𝓶𝓮𝓼 | Capital J and rounded connections |
Oliver | 𝓞𝓵𝓲𝓿𝓮𝓻 | High v exit and l loop |
Alexander | 𝓐𝓵𝓮𝔁𝓪𝓷𝓭𝓮𝓻 | Long name and crossing x |
Noah | 𝓝𝓸𝓪𝓱 | High o exit and tall h |
If your name isn't listed, you can create a decorative digital version using our Cursive Name Generator.
For handwriting, use the same basic steps: capital formation, lowercase letter practice, difficult joins, and full-name repetition.
How to Write Popular Names in Cursive
Let's look more closely at several familiar names and the movements that deserve attention.
How to Write Olivia in Cursive
Olivia contains a distinctive capital O, one tall l, two dotted i letters, and a high-exit v in many cursive models.
Practice it in parts:
O → li → iv → via
Study the chosen form of capital O before connecting the lowercase sequence.
Pay special attention to the v-to-i transition.
After writing the main lowercase letters, add the dots above the two i characters.
How to Write Emma in Cursive
Emma is a useful name for practicing repeated arch movements.
Begin with the uppercase E.
Then work through:
em → mm → ma
Keep the two lowercase m letters distinguishable.
If the middle becomes crowded, slow down and make the arches more consistent.
How to Write Sophia in Cursive
Sophia combines rounded shapes, an extended p form, a tall h, and a dotted i.
Practice:
So → op → ph → hi → ia
The lowercase o may finish at a higher point, depending on the handwriting style.
Keep the p descender controlled and the h tall enough to remain distinct.
How to Write Charlotte in Cursive
Charlotte is a longer name containing several different letter structures.
Practice:
Ch → har → rlo → otte
Focus on the tall h and l, the rounded o, and the repeated t letters.
Write the name slowly enough to preserve recognizable boundaries between the letters.
How to Write William in Cursive
William includes repeated tall lowercase l letters and two i letters.
Break it down as:
Wi → ill → lia → am
Pay attention to the double l and keep the two dots positioned above their matching i letters.
Because W is a capital, check whether your handwriting model connects it directly to lowercase i.
How to Write Alexander in Cursive
Alexander is a useful exercise for longer connected handwriting.
It includes a tall l, several rounded letters, a crossing x, and repeated e letters.
Practice:
Al → lex → xan → der
Write the main letter sequence first, then complete any crossing movements required by your chosen x form.
Maintain consistent spacing as the word becomes longer.
How to Write Short Names in Cursive
Short names may seem easier because they contain fewer letters, but every shape becomes more noticeable.
Names such as Mia, Ava, Leo, Zoe, and Kai offer little room for uneven spacing or overly large capitals.
For a short name:
- Keep the capital proportional to the lowercase letters.
- Avoid making decorative flourishes larger than the name itself.
- Make each letter recognizable.
- Keep the writing on one consistent baseline.
- Practice at a comfortable speed.
For example, with Mia, focus on a balanced uppercase M followed by a small i and a rounded a.
With Zoe, pay particular attention to the capital Z, which can look unfamiliar in some traditional cursive systems.
A simple, readable short name often looks more elegant than one with excessive decoration.
How to Write Long Names in Cursive
Long names create a different challenge.
As the number of letters increases, maintaining consistent size, slant, and connections can become harder.
Consider names such as:
- Alexander
- Isabella
- Christopher
- Elizabeth
- Anastasia
Begin by dividing the name into manageable letter groups.
For Christopher, you might practice:
Chris → to → pher
These are practice segments, not necessarily syllables or places where the finished name should be separated.
Write each group, correct difficult connections, and then combine the complete name.
If your handwriting becomes crowded near the end, practice the last few letters separately.
The goal is a name that stays balanced from its first capital to its final letter.
How to Write Hyphenated Names and Names With Apostrophes
Not every name follows a simple first-name-and-surname pattern.
Some names contain hyphens, apostrophes, multiple words, or accented characters.
Hyphenated names
For a name such as Anne-Marie, write the first part, add the hyphen, and begin the second part using its appropriate capital.
Don't try to connect cursive letters through the punctuation mark.
Names with apostrophes
For a surname such as O’Brien, write the capital O, add the apostrophe, and form the remaining letters according to the chosen style.
Keep the punctuation visible so the name is spelled correctly.
Names with accented letters
Preserve the correct spelling of your name.
For a name such as Renée, choose a cursive model that allows the accent to be added clearly.
The accent is part of the name, not optional decoration.
A traditional handwritten form may be easier to represent accurately than a limited decorative Unicode alphabet.
How to Make Your Cursive Name Look Beautiful
Once you can write your name clearly, you can begin refining its appearance.
Keep the letters consistent
Short lowercase letters should have similar proportions.
Tall letters should reach a reasonably consistent height, and descending letters should have enough space below the baseline.
Choose a comfortable slant
Your letters don't need to lean dramatically.
A steady, comfortable slant often creates a more balanced appearance.
Control your loops
Loops can make cursive look elegant, but oversized loops may create crowding.
Practice small, recognizable loops first.
Improve the spacing
Pay attention to the gaps between connected letters and between your first and last names.
A name with good spacing often looks more polished.
Add decorative flourishes carefully
If you enjoy creative lettering, try a small flourish on the opening capital or final letter.
Keep the decoration secondary to the name itself.
Practice with a smooth writing rhythm
Write slowly at first.
Once the movements feel familiar, gradually develop a comfortable natural pace.
The aim is handwriting you can repeat consistently, not a perfectly drawn word that takes several minutes to reproduce.
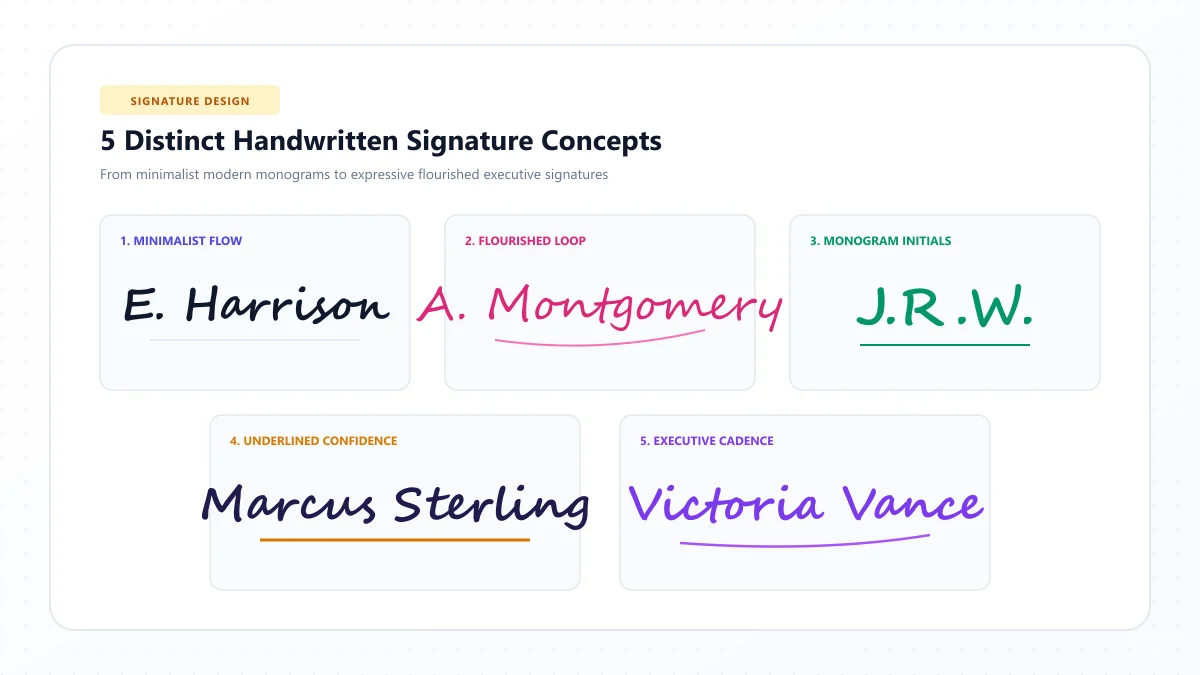
Cursive Name vs. Signature: What's the Difference?
A cursive name and a personal signature may look similar, but they aren't necessarily the same.
A cursive name usually emphasizes recognizable letters and consistent handwriting.
A signature is a personal mark used to identify or authorize a document. It may contain abbreviations, simplified strokes, or a more individualized writing rhythm.
Cursive name | Signature |
|---|---|
Usually preserves readable letterforms | May include abbreviated or stylized forms |
Useful for handwriting practice | Used as a personal identifying mark |
Often follows a handwriting model | Can develop into a highly personal style |
Prioritizes clear spelling | May prioritize repeatable personal movement |
Can be practiced with letter guides | Often developed through repeated signing |
If your goal is everyday cursive handwriting, begin with a readable name.
Once you're comfortable writing it, you can explore a more personal signature style.
For digital signature-style inspiration, use our Cursive Signature Generator.
Remember that a decorative digital signature image is not automatically equivalent to a legally authenticated electronic signature.
Common Mistakes When Writing Your Name in Cursive
Even familiar names can become difficult to read when small handwriting problems build up.
1. Making the capital too large
An oversized capital can overwhelm the remaining letters.
Fix: Keep the capital proportional to the rest of the name.
2. Forcing every letter to connect
Some cursive models require deliberate pen lifts, especially after certain capitals.
Fix: Follow the correct joining rules for your handwriting style.
3. Mixing different cursive styles
A decorative Spencerian capital combined with unrelated school cursive lowercase letters may look inconsistent.
Fix: Choose one primary model while learning.
4. Crowding repeated letters
Double letters such as ll, mm, and tt may merge.
Fix: Practice the repeated pair separately.
5. Making loops too narrow
Tightly closed loops can become difficult to distinguish from straight lines.
Fix: Give each loop enough interior space.
6. Using uneven word spacing
A first and last name may look awkward if the space between them is too small or too large.
Fix: Use a consistent, comfortable word gap.
7. Writing too quickly
Rushing can distort familiar letter shapes.
Fix: Slow down until the movements become controlled and repeatable.
8. Adding too many flourishes
Decorative strokes can make the spelling difficult to recognize.
Fix: Add flourishes only after establishing a clear basic name.
A 5-Minute Daily Cursive Name Practice Routine
You don't need an entire handwriting lesson every time you practice your name.
Try this short routine:
Time | Practice |
|---|---|
Minute 1 | Write the capital letter five times |
Minute 2 | Practice your two most difficult lowercase letters |
Minute 3 | Repeat difficult letter pairs |
Minute 4 | Write your complete first name |
Minute 5 | Write your full name and review spacing |
Use lined paper during early practice.
If five minutes isn't enough for a difficult letter, spend more time on that one movement.
Repeat the routine as needed and save an occasional dated sample to compare your progress.
A 7-Day Plan to Write Your Name Beautifully
This flexible routine helps you gradually combine the elements of your name.
Day | Focus | Activity |
|---|---|---|
Day 1 | Letter identification | Write your name in print and study its cursive forms |
Day 2 | Capital letter | Practice the first uppercase letter |
Day 3 | Lowercase letters | Practice the remaining letter shapes |
Day 4 | Connections | Work on difficult two-letter combinations |
Day 5 | First name | Write your first name several times |
Day 6 | Full name | Add your surname and adjust spacing |
Day 7 | Review and style | Compare samples and refine one detail |
Seven days is simply a way to organize practice, not a guaranteed timeline for learning cursive.
Work at a pace that allows you to form each letter correctly.
How to Help Kids Write Their Names in Cursive
Children often enjoy practicing their names because the words are familiar and personally meaningful.
Start by showing the child's name in a consistent cursive handwriting model.
Demonstrate the first capital letter and any difficult lowercase forms.
Then use a simple sequence:
Watch → Trace → Copy → Write independently
Keep the activity brief and suited to the child's current handwriting skills.
If a child is already learning a particular cursive method at school, use the same letterforms for home practice.
You can make the activity more enjoyable by writing name cards, decorating notebook covers, or creating handwritten greeting cards.
For younger learners who have not yet developed the necessary handwriting control, begin with age-appropriate letter and movement activities rather than forcing full connected names.
How Adults Can Improve Their Cursive Names
Adults may already know how to write cursive but want their names to look more attractive.
Start by writing your name in your usual handwriting.
Then check for inconsistent capitals, crowded letters, irregular loops, or awkward joins.
Choose the feature that makes the biggest difference.
For example, if your last name looks compressed, practice it separately before writing your full name again.
If your capital is overly decorative, try a simpler version.
A name can look elegant without imitating elaborate calligraphy.
Readability, balance, and comfortable movement are usually better starting goals.
Can You Generate Your Name in Cursive Online?
Yes. Online cursive name generators let you type a name and view it in decorative script-style text.
Our free Cursive Name Generator provides more than 20 visual typography styles, including cursive, bold script, and decorative lettering.
You can enter a first name, full name, or initials, then copy a favorite style or export a PNG image.
For example:
Normal name: Sophia Miller
Bold cursive: 𝓢𝓸𝓹𝓱𝓲𝓪 𝓜𝓲𝓵𝓵𝓮𝓻
Elegant script-style example: 𝒮ℴ𝓅𝒽𝒾𝒶 ℳ𝒾𝓁𝓁ℯ𝓇
These examples can be useful for digital design, profile decoration, and visual inspiration.
However, generated Unicode letters don't show the physical movements used to write your name by hand.
If your goal is actual handwriting, use a reliable stroke-order reference and practice the movements on paper.
Frequently Asked Questions About Writing Names in Cursive
How do I write my name in cursive for beginners?
Begin with the first capital letter, practice the lowercase letters separately, and learn the appropriate connections between them. Then write your complete name slowly using a consistent cursive handwriting model.
Can I write any name in cursive?
Yes. Names of different lengths and spellings can be written using cursive letterforms. Preserve the correct spelling, accents, hyphens, and apostrophes.
How do I make my name look beautiful in cursive?
Focus on recognizable letters, consistent proportions, smooth connections, controlled loops, and balanced spacing. Add decorative details only after the basic handwriting is clear.
Should capital letters connect in cursive names?
Not always. Many cursive handwriting systems use separate capital letters, while others allow certain capitals to connect to the following lowercase letter.
How do I write my full name in cursive?
Practice your first and last names separately, then write them together with a clear word space. Use consistent letter sizes, capital styling, and baseline alignment.
What is the easiest name to write in cursive?
Short names with familiar letterforms, such as Mia or Anna, may be manageable for some learners. Difficulty depends on the chosen handwriting style and the letters a learner already knows.
How do I practice a long name in cursive?
Divide the name into manageable letter groups, work on difficult connections, and then write the entire name without unnecessary pauses. Check that the writing remains consistent from beginning to end.
Can I write my name in cursive without joining every letter?
Yes. Some cursive styles use intentional pen lifts, particularly after capitals or with particular letterforms. Smooth, readable handwriting matters more than forcing every letter into one continuous stroke.
Is writing my name in cursive the same as making a signature?
No. A cursive name generally keeps recognizable letterforms, while a signature may be more personal, abbreviated, or stylized.
Can I copy and paste my name in cursive?
Yes. A cursive name generator can create decorative Unicode text for copying into compatible digital fields. This is different from physically writing cursive letters.
Do cursive names work on Instagram and TikTok?
Some decorative Unicode name styles can be pasted into compatible display-name or bio fields. Usernames and other account identifiers may restrict special characters, and compatibility varies.
Which cursive handwriting style is best for names?
A readable and consistent style is usually a good choice for everyday handwriting. Traditional looped cursive, simplified modern cursive, and historical scripts offer different appearances.
Final Thoughts: Make Your Cursive Name Personal
Learning how to write your name in cursive is a small skill with a personal reward.
You don't need to master every decorative handwriting style or make your name look like professional calligraphy.
Start with the first capital, practice the lowercase letters, and learn how the connections work.
Then write your name slowly, compare your results, and improve the parts that feel difficult.
With practice, your cursive name can become smoother, more balanced, and more natural to write.
If you want to explore different digital lettering styles, try our free Cursive Name Generator. You can also browse the Cursive Alphabet Chart and Cursive Letters Directory for additional letter references.
References and further reading
These links are provided for further reading. External websites and information may change.